Troubleshooting Guide for KeyLocker
KeyLocker is a powerful code signing tool that allows you to store your Code Signing certificate in the cloud and securely sign its hash remotely. However, the initial setup has certain pitfalls, which this article will help with.
Article Content
Review Variables
A crucial step for KeyLocker to work on your system is the correct setting of the variables. They determine not only the path to the signing tools but also mainly carry the authentication information. You can set them for one session or permanently.
You can set variables in the system in various ways. Besides a separate file and variables, you can also store them in the Windows Credential Manager. If you want to sign using GUI, you can set them in the Click-to-sign utility, which you can find in your KeyLocker account (however, the variables will not work at the system level).
You can set a variable in Windows easily using the command line. Run cmd and type setx VARIABLE=value. Note - setx works with user variables, not system variables.
For the proper functioning of KeyLocker, it is necessary to set variables for client authentication + location of signing tools and DigiCert libraries.
Authentication Settings
- SM_CLIENT_CERT_FILE - path to the location of the authentication certificate with the extension p12, which you downloaded from the guide in DigiCert ONE
- SM_HOST - DigiCert ONE host address, which is https://clientauth.one.digicert.com
These two variables are not secret because the certificate is protected by a password. You can safely set them in the system. The next two variables are secret and I recommend not setting them in the system if it is accessible to multiple users. It is better to store them in the Windows password manager. For more information about setting variables for Windows, see the article Credential setup for Windows.
- SM_API_KEY - API key, which you generated in the DigiCert ONE interface
- SM_CLIENT_CERT_PASSWORD - password for the authentication certificate in P12, which was displayed to you once in the DC1 guide
Set Path to Signing Tools
Adding a value to the PATH variable is done with the command setx PATH "path;%PATH%". This command adds a new value to the existing user values of the PATH variable and saves it permanently. For the proper functionality of KeyLocker, you need to set at least two:
- Path to the Windows SDK and signtool
- Path to DigiCert Keylocker Tools
Find a valid path to the Windows SDK (the path uses the version number you have installed). You will also need the DigiCert Keylocker Tools, which you downloaded and installed from DigiCert ONE; you can find them in C:\Program Files\DigiCert\DigiCert Keylocker Tools.
We will add both variables at once through CMD, otherwise one will overwrite the other:
setx PATH "C:\Program Files\DigiCert\DigiCert Keylocker Tools\;C:\Program Files (x86)\Windows Kits\10\bin\10.0.26100.0\x86\;%PATH%"You can also set system variables through Windows GUI; through CMD it is faster, but values overwrite each other with multiple inputs. It is also possible to use PowerShell.
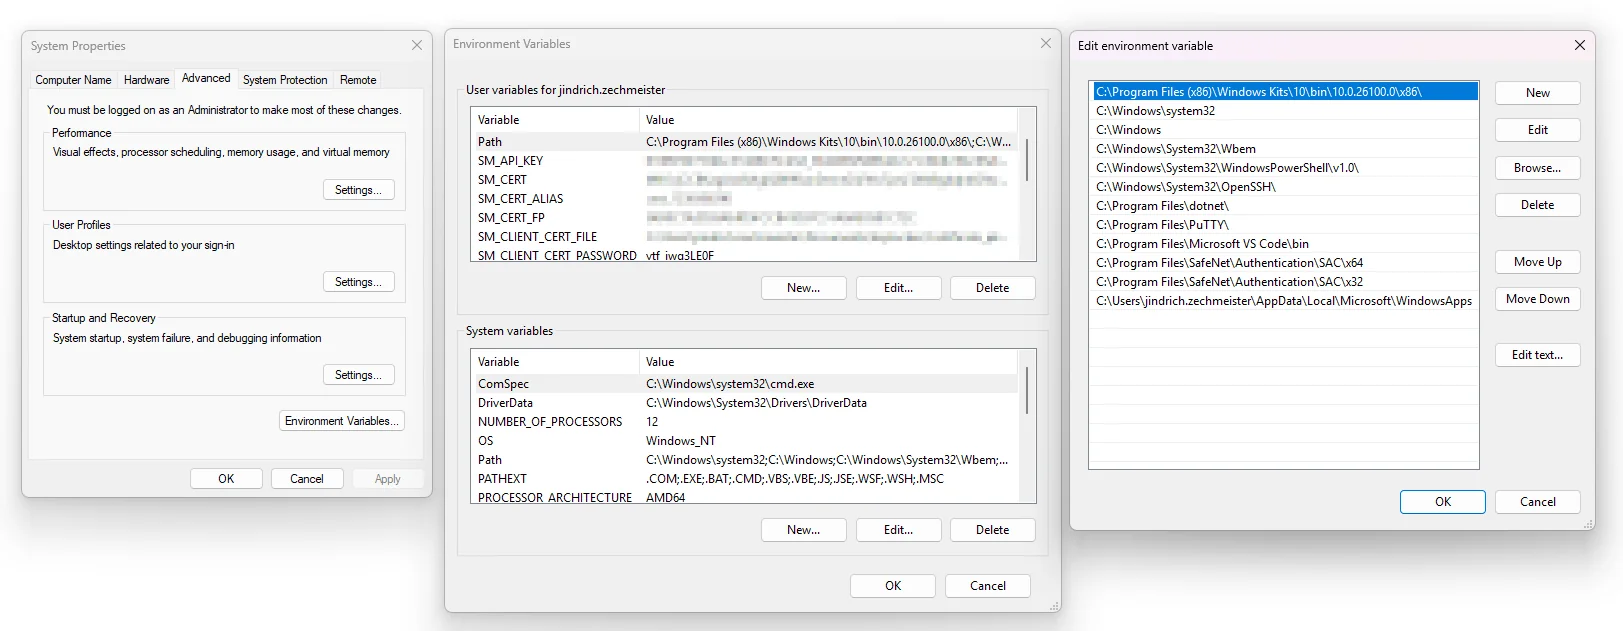
How to Manually Edit PATH Variable in Windows
If you want to ensure the values are preserved, you can edit PATH manually:
- Open Control Panel → System → Advanced system settings.
- Click Environment Variables.
- Find PATH (in System variables or User variables).
- Click Edit, add individual paths, and save.
How to Add PATH Variable Using PowerShell
If you want to permanently add a path to the PATH variable using PowerShell, follow these steps:
- Open PowerShell as an administrator (right-click on Start → Windows PowerShell (Admin)).
- First, find out the current value of the "PATH" variable:
[System.Environment]::GetEnvironmentVariable("Path", "User") - Then add a new path to the existing values:
$path = [System.Environment]::GetEnvironmentVariable("Path", "User") $newPath = $path + ";C:\Program Files\DigiCert\DigiCert Keylocker Tools\" [System.Environment]::SetEnvironmentVariable("Path", $newPath, "User") - If you need to add another path, repeat the process:
$newPath = $newPath + ";C:\Program Files (x86)\Windows Kits\10\bin\10.0.26100.0\x86\" [System.Environment]::SetEnvironmentVariable("Path", $newPath, "User") - After executing the commands, restart the command line or the computer for the changes to take effect.
Note: If you want to change the system "PATH" variable (applicable to all users), replace "User" with "Machine" in the command.
Note: After setting variables through CMD, restart the command line, otherwise the changes will not take effect!
Check variable value in CMD: echo %VARIABLE% For example "echo %PATH%". Then CMD will display its value.
Check Correct Configuration
KeyLocker tools include the utility smctl, which you can use for signing, but it also serves for basic diagnostics. The following command checks whether everything is set up correctly on the station and smctl can connect to the DigiCert cloud:
smctl healthcheckThe output will confirm whether you have connected to KeyLocker (authentication works) and whether smctl detects the presence of signing tools, such as signtool. Example:
smctl healthcheck
--------- Account Settings ---------
Teams: Disabled
Threat detection: Enabled
        Static Binary Analysis: Enabled
        Software Composition Analysis: Disabled

--------- User credentials ---------
Status: Connected

Username: XXXX-keylocker
Accounts: XXXX-1699076
Authentication: 2FA
Environment: Prod
Credentials:
        Host: https://clientauth.one.digicert.com
        API key: 010897bf735bbc57d48270cd3d_50dxxxxx...e4 (Pulled from environment variable)
        Client certificate file path: C:\Users\xy\Documents\keylocker\Certificate_pkcs12.p12
        Client certificate password: ytf_xxxxxx0F (Pulled from environment variable)
API keys:
        Name: xy (expires on Mon, 31 Dec 2029 23:59:59 UTC)

Client certificates:
        Name: xy (expires on Mon, 31 Dec 2029 23:59:59 UTC)

Privileges:
        Can sign: Yes
        Can approve offline release: No
        Can revoke certificate: Yes
        Can scan: No

--------- Signing tools ---------
Signtool 32 bit:
        Mapped: No
Signtool:
        Mapped: Yes
        Path: C:\Program Files (x86)\Windows Kits\10\bin\10.0.26100.0\x86\signtool.exe
Mage:
        Mapped: No
Nuget:
        Mapped: No
Jarsigner:
        Mapped: No
Apksigner:
        Mapped: No
If there is an authentication issue, check whether you have set the correct values obtained in the KeyLocker guide in the DigiCert ONE interface. If you have doubts, you can reset the guide and create new credentials.
You may also run into smctl not detecting signtool or other signing tools. This means it is necessary to add their location to the user's or system's PATH variable. See above in the section about variables.
MMC and Certificate Presence Check
If you are working on Windows, check the certificate manager, which you start with the command certmgr.msc. If synchronization with KeyLocker completes successfully, you will see a certificate with a private key flag in the certificate store. However, this does not mean that it is actually there with the private key - the certificate with the private key is still stored in the cloud.
If the certificate is not there, run the synchronization.
smctl windows certsyncUpon successful synchronization, you will see confirmation:
Syncing certificate for alias: key_1236506290, ID: ac793b6d-cac4-4be4-b145-003d4d1d63db and SHA1 Fingerprint: 54d0c7a2d93ae4d5fccb41d97c51a8ab3581c72cSigning Problems
If you have problems with signing, try going from the simplest to the more complex. The easiest way is to sign using the DigiCert utility smctl, which can also serve as an extension with signing tools such as signtool or jarsigner. This is the least conflicting way and requires no parameters. For troubleshooting, do not use a timestamp or any other options.
Sign with smctl simply:
smctl sign --keypair-alias=key_1234567890 --input C:\Users\John.Doe\Desktop\file_to_sign.exeYou can refer to the certificate using the "keypair-alias" or "fingerprint" parameter, you can find this information about the certificate, for example, using the command smctl windows certsync.
After signing, you can verify the signature:
smctl sign verify --input <path to signed file or folder>For signing help, see the article Sign binaries with SMCTL.
After successfully signing with smctl, you can sign with another tool, such as signtool. It should also work. Leave the choice of certificates automatic and gradually add more parameters.
Once it works successfully according to your expectations, you can try signing, for example, using Visual Studio or in another development environment.
Where to Find Logs
If all the above fails, and signing does not work, I recommend checking the logs of smctl and other DigiCert tools. If you use logs when solving a problem with our support, you will certainly expedite the resolution of the issue.
You can find the smctl utility log in the file smctl.log, which will be located in the /.signingmanager/logs folder within the given user profile. Try typing into CMD echo %USERPROFILE%/.signingmanager/logs and you will see the complete folder location.
Additional Resources and Information
- Common Errors - Troubleshoot Guide in KeyLocker documentation.
- KeyLocker Documentation on the DigiCert website
Do you have questions?
Don't hesitate to contact our customer support, who will advise and help you.



Has this article been useful?
Thank you for your feedback on this article.
We are sorry that you did not find the required information here.
Please help us to improve this article. Write us what you have expected and not found out.